Good models are not a one time thing

(3/4) This is the third of a series of four connected articles. (Read the first and second article, if you missed them.)
I hope you’ve got your preferred drink in hand ☕️🫖💧 The promise is that you should be done with this article before the end of your drink.
Last time, we simulated for the first time. We looked at how the hot beverage would evacuate its heat throughout the air and the mug. And we played a bit with the material of the mug and the size of the beverage. But there was a limit to our model!
Limitation or opportunity?
Yes, there was a limit to our model! The mug was staying on the desk and no one could benefit from the heat to warm their hands… And it starts to be quite convenient at this time of the year. For this scenario to be modeled, we need to change the type of heat exchange from the mug to the ambient.
I hear you saying “just delete this stuff on the right and put some other stuff that model the hands”. And you are right. It’s the famous “quick and dirty” way to solve this. (Sometimes it is useful.) And there is a much more elegant way to do this! We can define our own assembly of components as subsystem and easily change these instead. In some sense, we will give some depth to our model - like another layer of components.
It’s an opportunity because it allows for: - A cleaner model and understanding of what each model assembly does. Currently the coffee mug is still a simple model; imagine how a complex system could look like in this “flat” approach (read “all in one layer”). - A better reuse of each subsystem in a future model (or actually in the same model - imagine we need two cups). - Defining template where we can easily exchange matching models (e.g. switching between having hands around the mug or none, directly in contact with the air). - It is much easier to exchange model across tools this way. (Hey Christian Bertsch, don’t tell anyone but I am preparing the ground to talk about FMI in the next article!)
Let’s not accumulate too much technical debt - it’s always harder to make changes to the model when it is more complex - and update our model now.
Let’s get physical (interfaces)
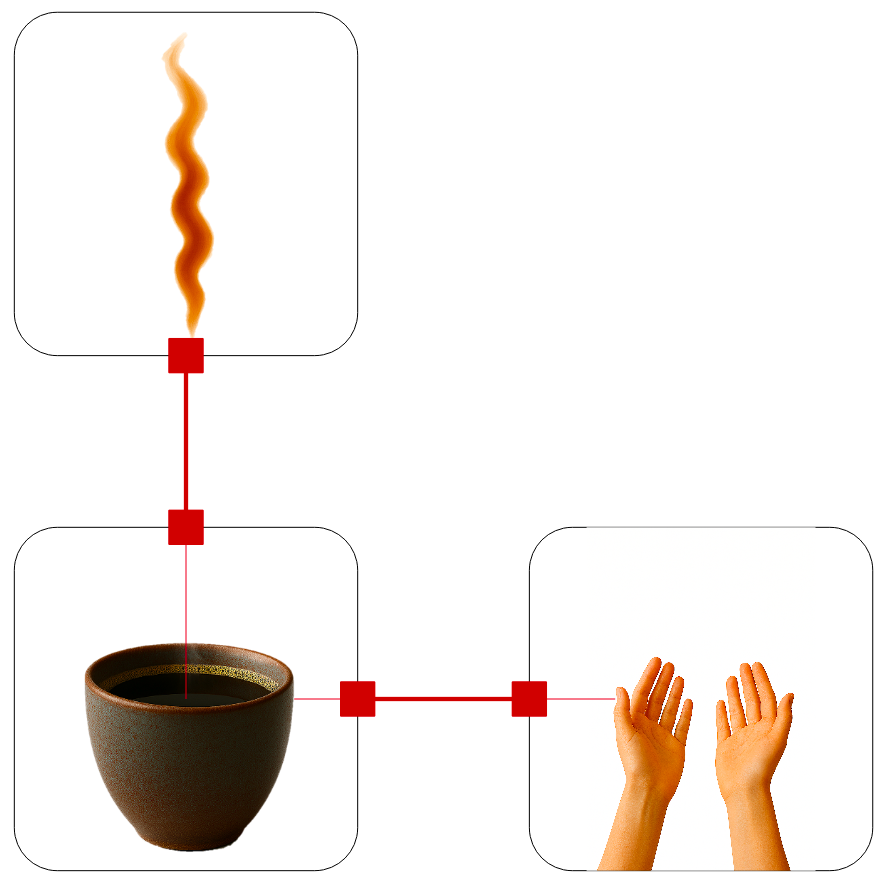
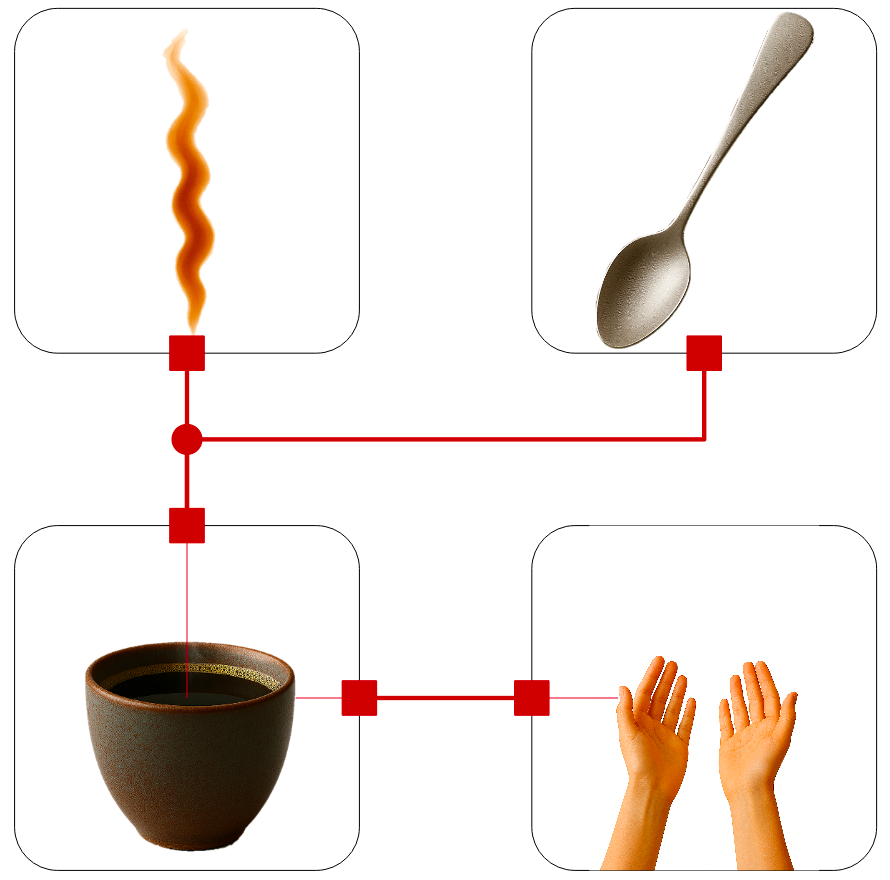
We could “cut” our model anywhere and make subsystems. It might not make sense but we could. Let’s not do that. We should rather stop and look at what make sense to have as physical subsystems and make these as models. And it is here quite straightforward: - A mug full of hot beverage. There are interfaces from the mug wall and from the beverage. - An environment to the mug. It could be the air or it could be our hands we want to keep warm. - An environment to the beverage. It could be the air also or a teaspoon - as Robin Leuering suggested in his comment. 😉
Getting off-script for a second: did you notice how I focused on the interfaces? In the first article of this series, I insisted on the need to perform “purpose-driven” modeling (term brought to you by Edo Drenth 🙌 I’ll get back to it in its full form (purpose-driven fidelity) in another article). We need to answer several questions when doing a model and interfaces are one of these, a very important one. And submodels are models! Back on track now 👉
There is no unique decomposition, as you can expect. You might have stopped a second at the first point and wondered why the mug is not one model and the beverage a second model. The mug would have an inner and outer wall (interfaces again) and the beverage might keep its single interface or have several (depending on whether we want to model conductance within the beverage - at the moment, it is just an energy storage). I just chose simplicity for now. Feel free to do chose something else.
And even if there is no unique decomposition, I would recommend you keep it always physical. (Hence the heading of this section!)
 (Not that much of a) Pro-tip: Now, we have not change anything from our previous model. We have only restructured it and made its components available for reuse. That means that the first thing to do is to re-simulate and make sure that the results are unchanged!
Getting hands-on
I like to warm my hands with my mug. That also keeps the coffee warmer for a longer period of time… at least I believe… Is it true? Let’s model, simulate and get the answer!
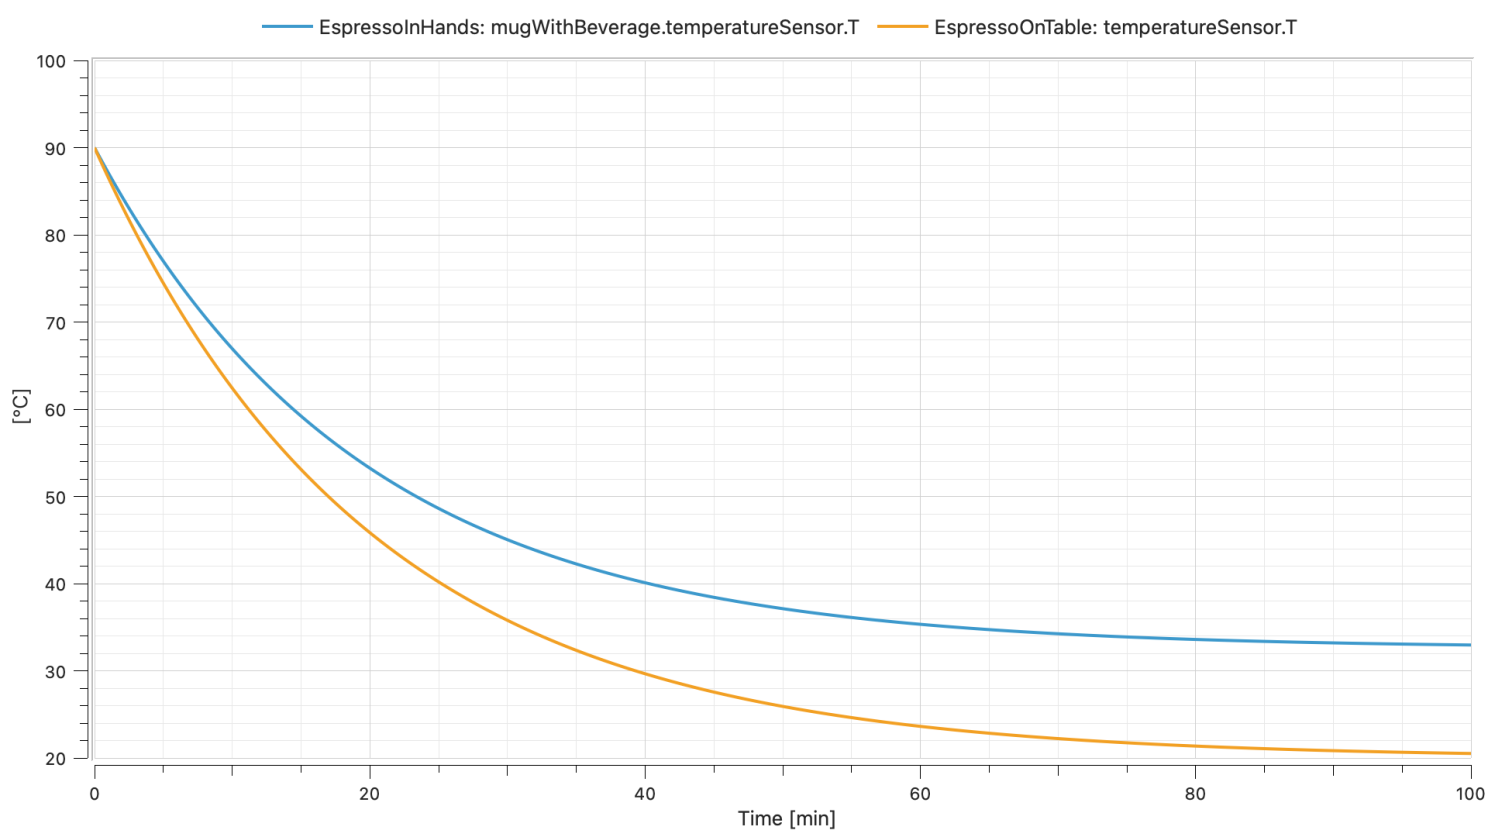 So I wasn’t all wrong! The hands “keep the espresso warm”. The hand temperature being much warmer than the air, the heat transfer (despite a higher conduction than the air convection and radiation) leads to a lower heat transfer, resulting in a warmer coffee, for a longer period of time!
Note for clarity: getting your hands on the coffee might actually in some cases lead to a faster cooling at the beginning and yet the hand temperature would at the end make the coffee stay warmer after a given period (the hand temperature being warmer than the air).
The teaspoon effect
Back to Robin question: what is the effect of adding a teaspoon in the coffee? I decided here to model the spoon as a heat capacitance that has a thermal conductance to the coffee and a radiation and convection to the environment.
A great thing with our restructuring is that we can now nicely connect the spoon to the coffee port, et voilà ! The heat transfer will happen to the spoon!
What’s you guess? Mine? Ah yes, it is kind of a monologue here… true! Well, I guess the teaspoon will absorb some heat from the coffee and dissipate it partly to the environment. And guess what?!
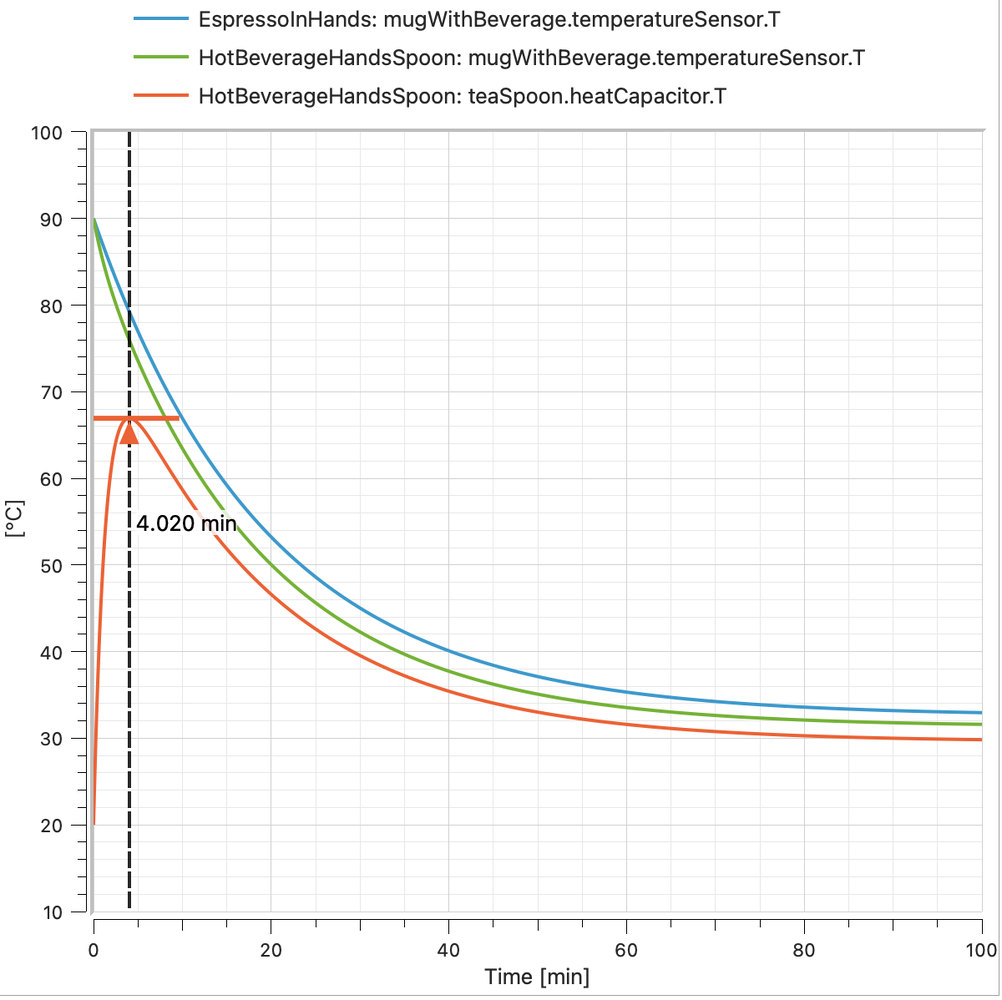
The spoon temperature - initially at room temperature - rises very quickly! Absorbing a lot of heat from the coffee, which consequently cools down a bit faster. After some minutes (around 4min), the teaspoon reached a maximum of 67°C and starts cooling down synchronously with the coffee. Clearly, the effect of the spoon leads to a cooler coffee than without. 😉
An important note on the tools!
Have you noticed that the diagrams and curves on this article and the previous one are looking different? The reason for that is that I used different tools! But the models are the same! This is one of the great power of Modelica!
The models I developed are only using pure Modelica language syntax so they are not tool specific. In the previous article, I used Modelon Impact for the modeling and simulation, while for this article I have used Wolfram System Modeler. Both Modelon and Wolfram provided me with a free license for the purpose of writing these articles.
It is important to mention this because we need to keep in mind that Modelica is not a tool. It is a language that is leveraged in many tools. And this newsletter teaches you the language, not a tool. Feel free to chose your preferred tool.
As for myself, I will stay as neutral as possible here and hopefully get free licenses from other tool vendors to offer you images and curves from any possible Modelica tool!
The END for today
Enough for today. Next time, we will finally get to discuss the FMI standard!
Break is over, go back to what you were doing.
Clément
Next ->
© 2025-2026 Clément Coïc — Licensed under creative commons 4.0. Non-commercial use only.