You won’t forget your first time… modeling

(1/4) This one is the first of a series of four connected articles.
I hope you’ve got your preferred drink in hand ☕️🫖💧
Today it is about building our first model! And we will need your drink… so to say. Because we are going to discuss how long it takes for your cup of hot beverage to cool down.
Yet, I want to keep the promise that you would be able to read this under 10 minutes and there are some fundamentals I want to discuss. So today is about modeling, and next time it is all about simulating. And there are two more steps I keep “secret” for now. Hence the (1/4). Hope this is more suspense than annoyance 😅
🙋 Can we start with Modelica now?
Well, almost! We first have to answer a few questions. And keep note of these questions, they are the base of any model: - What is our system under study? - What answers do we want from this study? - What are its interfaces? - How does it interact with its environment? - What is happening inside our system? (In System Engineering, we would say “what are its synergies?”)
As we are describing the system, we are necessarily approximating it in some sense. So writing down what is the scope of our study, hence the associated model capabilities, is key to not misuse the model. There is the very famous quote:
All models are wrong, but some are useful.
from George E. P. Box, that everyone keep mentioning so I thought it makes no sense to repeat it here… 🙄🤦
At least I can add that for the models to be useful, they have to be made and thought for a purpose. You got the point: we need to think before acting. It’s going to be brief, and yet it is such a useful practice that I need to enforce the habit here.
A look at your hot mug
Let’s answer these famous questions now and the first ones, I gave a spoiler at the very beginning of this article: we are studying your hot beverage and answering the question “how long it takes for your cup of hot beverage to cool down?”.
From our perspective, the system is the hot beverage and its mug. While we care about the temperature of the beverage, the mug is its container and we would not separate them. The interfaces are thus the walls of the mug and the free surface of the beverage, in contact with the air.
How does the system interact with the environment? It depends what is the environment 🙂 Is the mug on the table? Are your hands around your mug? Does your mug have a cover? These could be different interfaces which involve different heat transfers. Consider the two first cases, as illustrated below. In the first case, both the mug and the beverage can have convection in and radiation through the air (environment). In the second case, the mug is supposed to be totally covered by the hands and thus we get conduction between the mug and the hands as heat transfer.
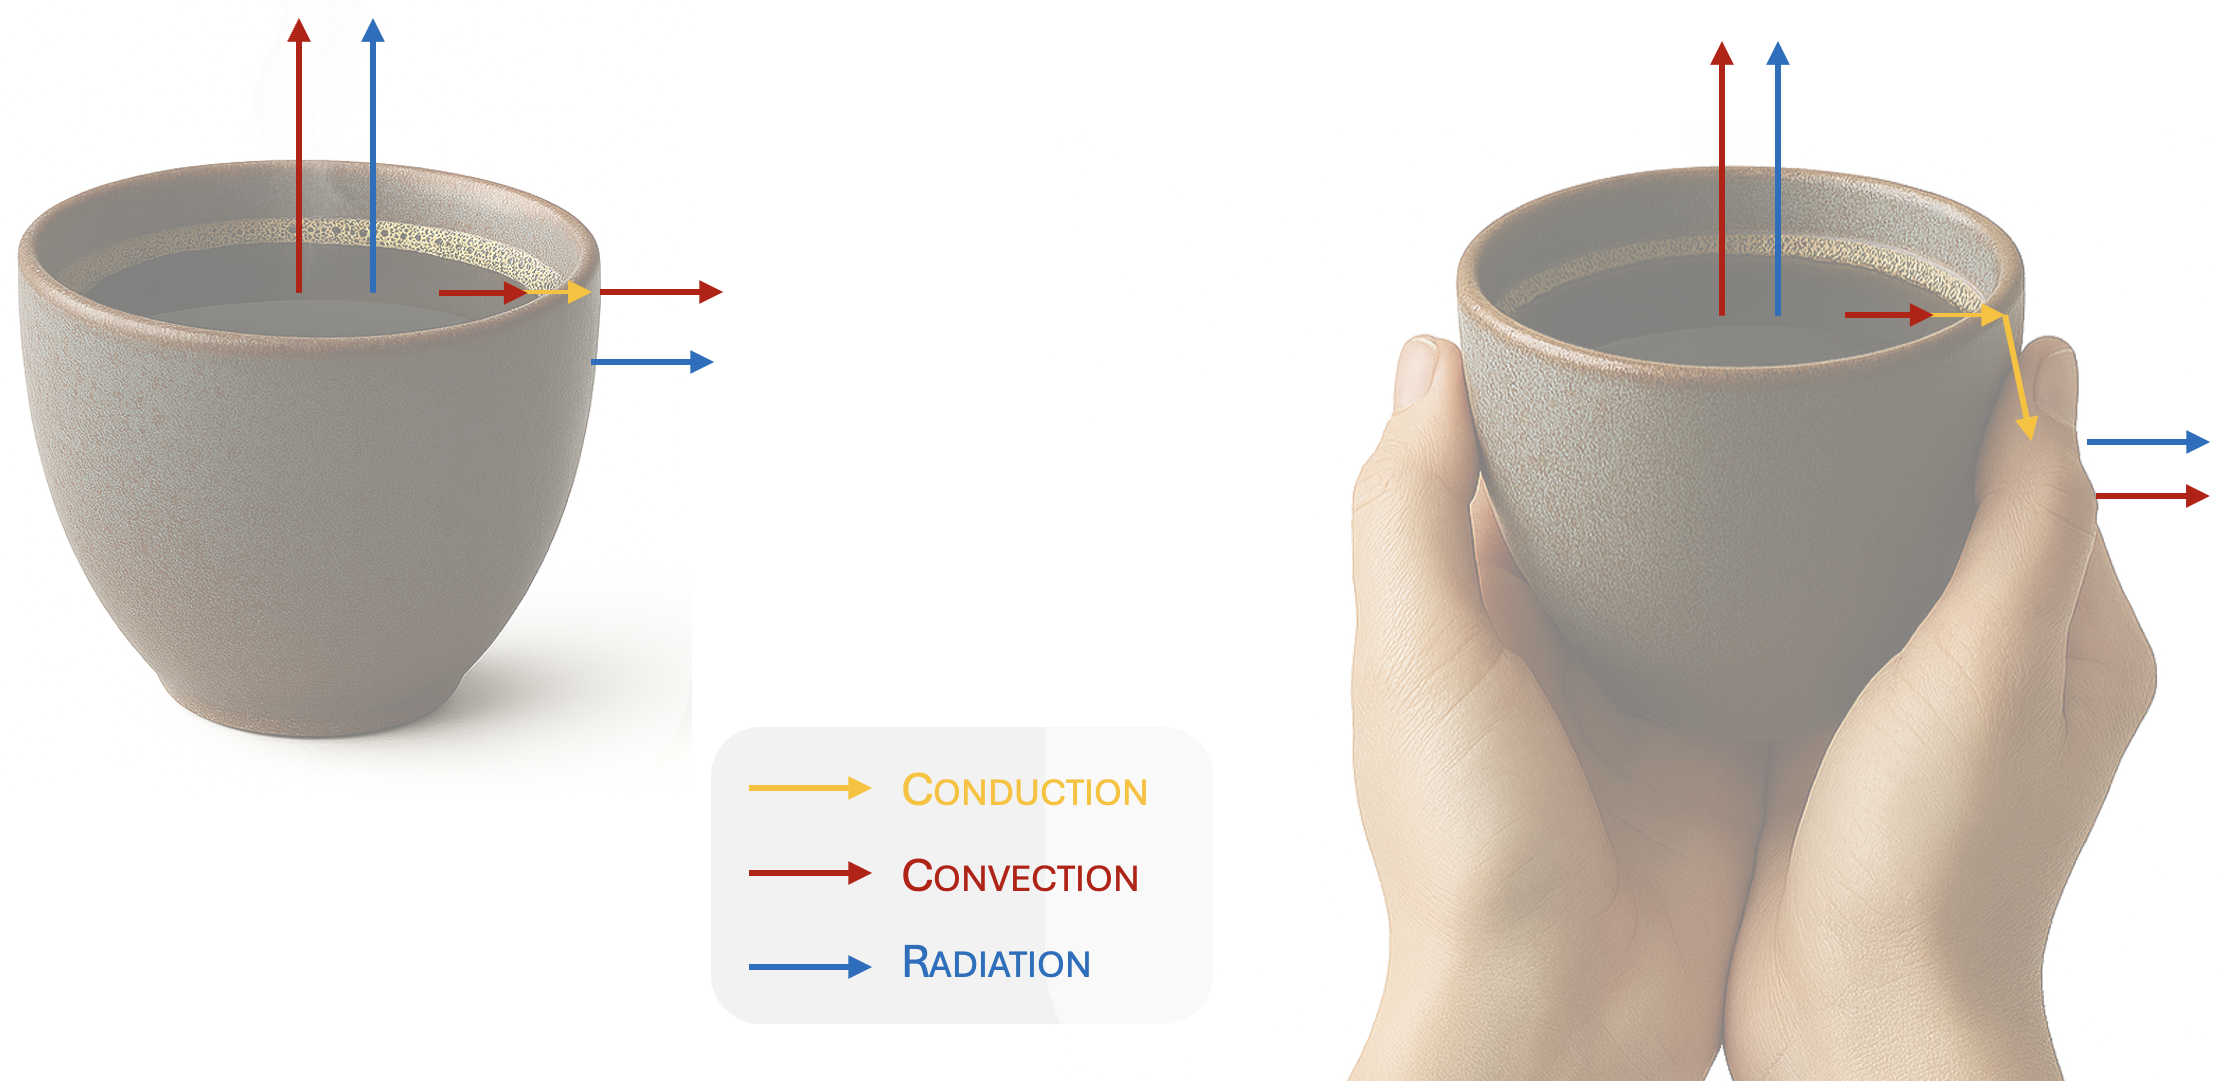
In addition, there is convection between the coffee and the inner wall of the mug, and conduction through the mug wall (synergies).
Note: We could answer different questions and these may or may not influence what is the scope of our model. For example, if you want to know how long you have to wait until your tea cools down to a temperature you like to drink it, it might be the same model as if you wonder the time for it to be at ambient temperature. However, if you want to study the impact of adding cold milk in your drink, the below simplified heat transfer study isn’t enough.
Finally some Modelica!
You have been waiting for it! Now, it’s time to model. And don’t worry, we won’t have to model all the equations and properties needed. We are going to leverage the thermal package from the Modelica Standard Library - MSL from now on.
Note: the image was big, I know. That does not count as much reading time, eh!
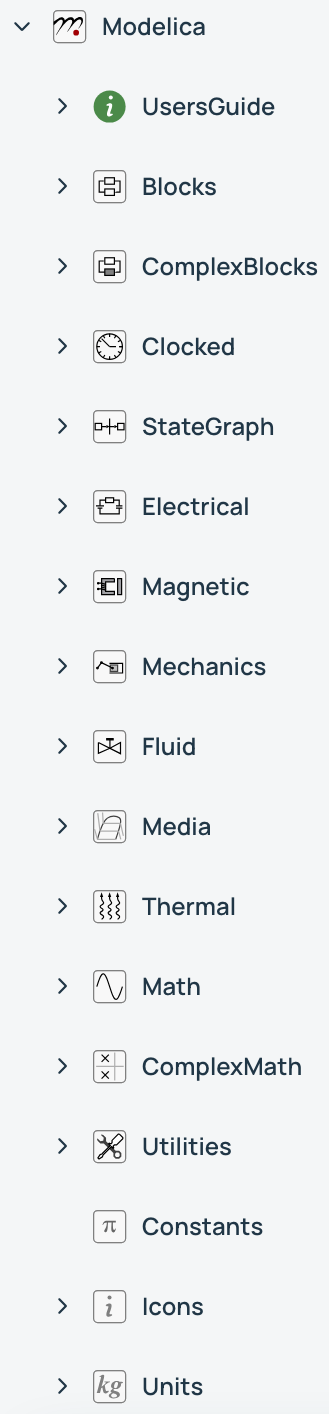
The MSL is maintained by the Modelica Association - very convenient! - and it contains most base models you need for each physical domain. The MSL is a package (read “folder”) that appears simply as “Modelica”. When we refer to a model or subpackage (read “subfolder”, I guess that one was clear), we just describe its path to it, adding dots between each package/model. For example, Modelica.Constants refers to the subpackage within the MSL that hosts all the constants. Today, we are mostly using Modelica.Thermal.HeatTransfer, and to make the path shorter, I’ll just start the path at HeatTransfer for the rest of the article.
Great, we need to speed up - I promised my articles would be about 10minutes to read.
We will model as per the left image above (without hands) and we are considering the beverage to be a “heat capacitor” (HeatTransfer.Components.HeatCapacitor), which basically is a storage of thermal energy. The heat transfer elements we need are also available in the MSL: - Conduction: HeatTransfer.Components.ThermalConductor - Convection: HeatTransfer.Components.Convection - Radiation: HeatTransfer.Components.BodyRadiation
Lastly, we also need to model the environment and because I am in a cosy room with harmonized constant temperature, I will use a fixed temperature source to model the environment (HeatTransfer.Sources.FixedTemperature).
Now the fun begin! We just have to drag and drop the components in the canvas of our preferred tool and connect the models meaningfully. (And if you don’t know which tool to use, let me know!) If you want to see this in action, you can watch Ankit Anurag Naik doing it for a similar model with Wolfram System Modeler.
📢 Going off script now: at this point, I want to give a shout out to Ankit and Jan Brugård from Wolfram MathCore, who shared this video with me last week. After watching it, I changed this article to model a cup of hot beverage instead of my initial system (I’ll keep it secret for another time 😉) because it is so much aligned with the mindset of this newsletter: Learn Modelica and FMI during your break. Now, back to the modeling!
Here is how our first model looks like:
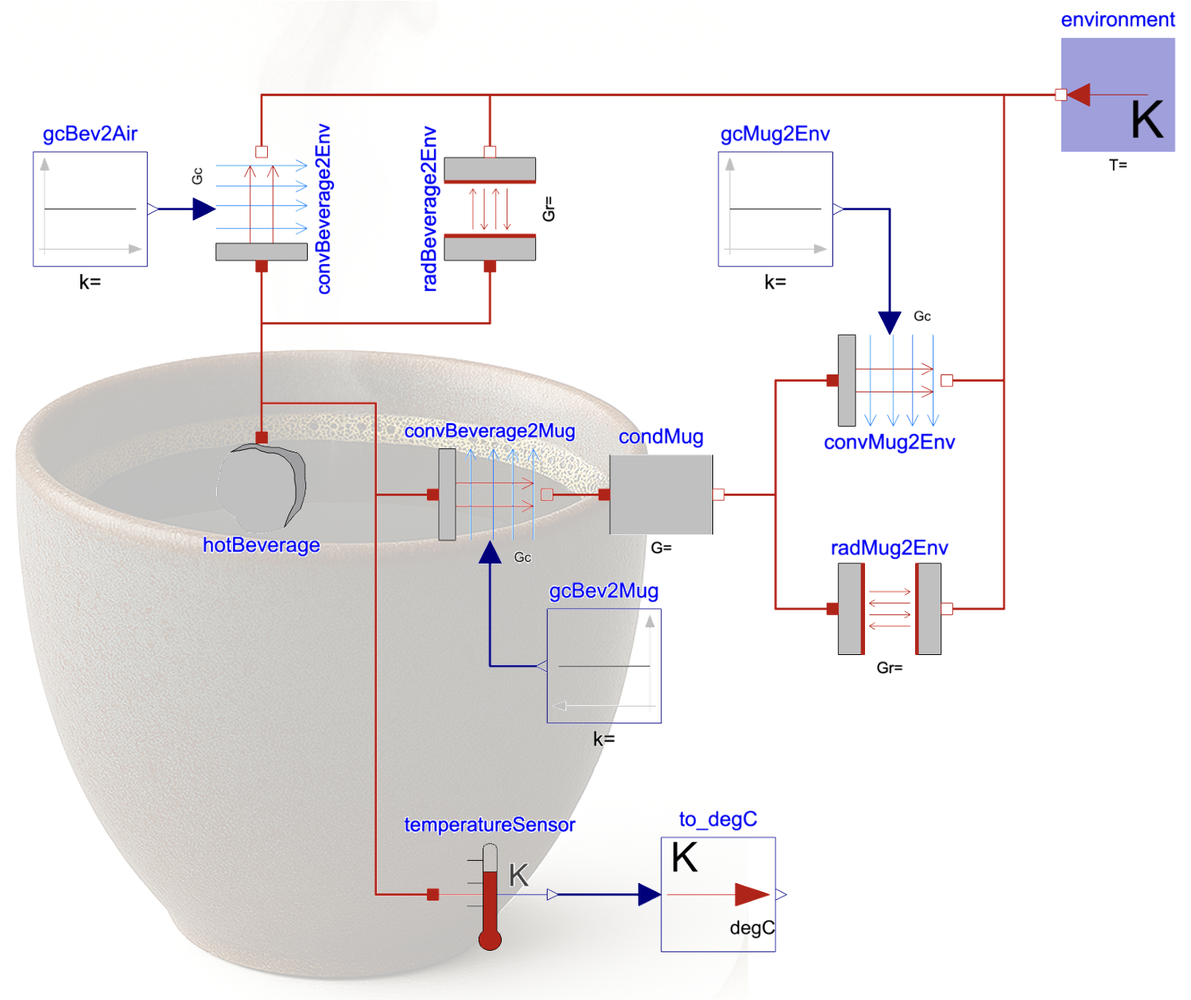
A couple of useful notes here: - You can see that allTheNames are written likeThat. That is called camelNotation and is the naming convention in Modelica. Basically, you start with a lower case and stack the rest of the name with uppercase on the first letter of each new word. - There are a few more components than expected in the model. You see constant inputs (Modelica.Blocks.Sources.Constant) for example - they just provide a value to the convective thermal conductance of the convection component. And there is the thermometer and to_degC block, which basically help us getting the beverage temperature in degree Celsius - quick and easy access to read the value. - Here I want to emphasize that Modelica work with SI Units.
And there is one more important thing to say: so far, no parameters have been set yet. So we could not simulate the model as is. We are getting there.
In search for parameters…
We have done some of the most important work: understanding what is our system, its interfaces, what physical effects we want to model… and we event started our model!
Funny enough (well not thaaaat funny), I have to tell you that often, the models are defined based on the parameters you know, not the other way around. So you might choose different model “fidelity” (read “level of detail”) because you are not able to get some parameters. What is the point of using a complex equation modeling friction if you do not know how to parametrize it or if you don’t have the data to calibrate these parameters? Spoiler: there is no point. Better using a simpler model that you have parameter/data for.
In our case, these are easy parameters to get from your preferred thermodynamics book, THE internet or you could even ask your favorite AI chatbot. For this article, it would be too long and boring to write all parameters, so let just me detail ONE and I will find a different place to detail ALL of them. And the chosen one is the total heat capacity of the beverage.
Let’s consider you have a cup of tea in your hand (my image is coffee and I want to be inclusive here 😉). The cup is 25 centiliter (2.5x10⁻⁴ m3) full of water, which has a density of 1000kg/m3 and a specific heat capacity of 4180 Joules/K/kg - which means it takes 4180 joules to raise 1 kg of water by 1°C (of 1 Kelvin, as it is a difference, it makes no difference… if that makes sense). So the total heat capacity of the hot beverage is:
C = (4180 J/K/kg) x (mass of water) = 4180 x (2.5e-4 m3 x 1000 kg/m3) = 4180 x 0.25 = 1045 J/K.And so we proceed for all parameters. Anyone taking the challenge to post as a comment the value and explanation for all parameters❓😃 The ones that do it will get cited in the next article 🥳
It is all code behind!
Do you remember that last time we discussed that there is a duality between the graphical view and the Modelica code? Well here you can see the exactly same model in code:
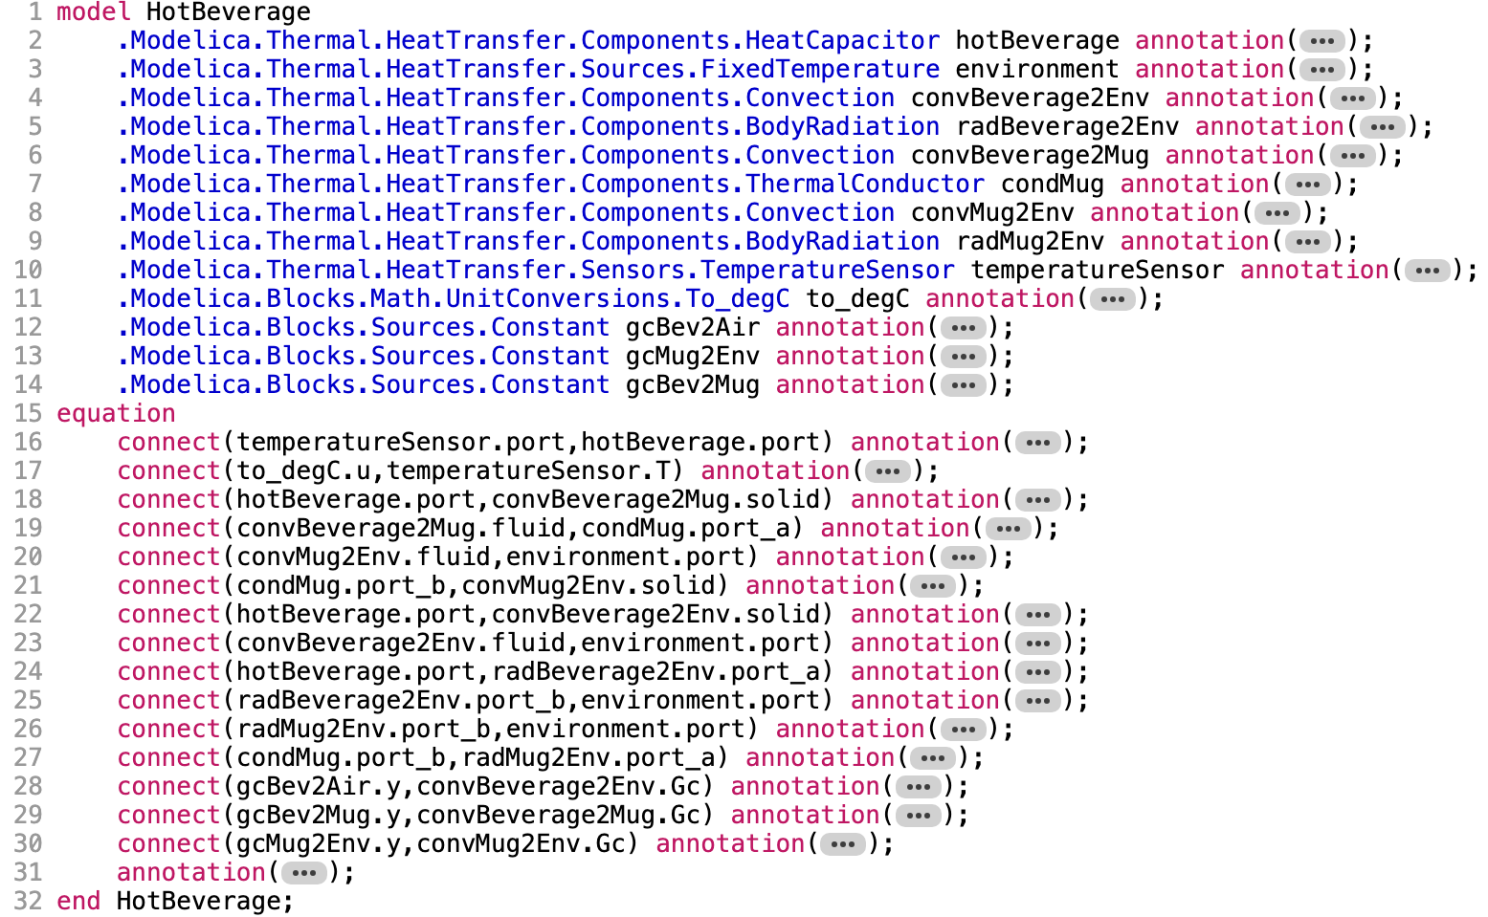
You are now better equipped to read this code. It is not needed, yet I guess that it should be possible. The blue text is the path to the model that is used and the following black name with camelNotation is the name of the “instance of the model” (mean the one that is on the model canvas). And then you have all connection lines that are “connect()” statements in Modelica between the specified ports of each component of the model. See how we refer to the port in the model using the dot notation (as for the path), it is because of the Object-Orientation aspect of Modelica. We’ll soon dig into that further.
Note: “Instance” seems quite a technical term. It is not complex though. The cup or mug you might be holding in your hands might be one of many produced from a blueprint. And you might have chosen the blue cup while others might have a brown version. In Modelica, a model is a blueprint that you can “instantiate” - every instance is a reference to the blueprint and can be parametrized differently without affecting the blueprint, like your cup.
📢 Call for experts!
This is what is called a “flat model”, all components are at the top level of the canvas. A coming improvement is to make this model more reusable by having each subsystem in a different model. (That’s a spoiler 🤐) Another is to add a model description, comments and documentation. And there are more improvements to do!
Share your thoughts on how this model should be improved, in comment. Show the world what it possible to do 😎
The END for today
Enough for today. Next time, we will simulate this model and find out how long is “too-long-article-to-read” (meaning that your beverage is either cold or drunk already).
Oh, and FMI is coming, be patient!
Break is over, go back to what you were doing.
Clément
Ps: if you want to have a spoiler of what’s to come, you’ll have to invite me for a hot beverage 😉
Next ->
Bonus: resources for fast learners
- Repeating the link from Ankit’s demo
- Just below this video, there are further videos about the Guiding Principles for Systems Modeling and Simulation. Keep these in mind!
© 2025-2026 Clément Coïc — Licensed under creative commons 4.0. Non-commercial use only.